Introduction
Your wedding day hair needs to hold up through ceremonies, outdoor photos, tearful speeches, and a full evening on the dance floor. That is a tall order for any style. But if you have been eyeing those gorgeous, effortless waves that look just as fresh at midnight as they did at noon, a hair waver is exactly what you need in your corner.
Understanding hair waver basics for weddings makes the difference between waves that fall flat by cocktail hour and waves that look bridal-worthy all day long. The tool itself is simple. The technique is what takes a little learning. Whether you are a bride doing her own hair, a bridesmaid helping out, or a wedding guest who wants to arrive looking polished, this guide walks you through everything. You will learn the right waver size for your look, the best temperatures for your hair type, how long to hold each section, and how to make those waves last from the first vow to the last dance.
What Is the Best Way to Use a Hair Waver for a Wedding?
Using a hair waver for a wedding is not the same as using one on a casual Tuesday morning. Wedding hair needs to be intentional, long-lasting, and camera-ready. The best approach combines proper prep, the right tool size, correct heat settings, and a solid finishing routine.
Start with clean, fully dry hair. Any moisture left in the hair when you use a waver can cause frizz and reduce how long the waves last. Apply a heat protectant before you begin. This protects your hair from damage and helps the wave set more evenly.
Work in sections. Clip the top layers away and start at the bottom. This layered approach ensures every part of your hair gets waved and the style looks full and consistent from root to tip.
Choosing the Right Waver Size for Your Wedding Look
Not all hair wavers produce the same result. The barrel size you choose changes the shape of the wave entirely. Here is a simple guide to help you match the tool to the look you want.
Loose, Beachy Waves
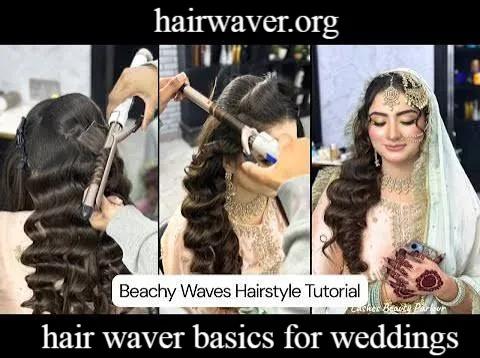
For soft, relaxed waves that photograph beautifully outdoors, choose a waver with a barrel size of 1.25 to 1.5 inches. This size creates generous, flowing waves that feel effortless and romantic. It works especially well on medium to long hair. hairwaver
Medium Waves with Definition
A 1-inch waver gives you waves that are more defined without feeling tight or overdone. This is the most versatile size and works beautifully for both updo-adjacent styles and hair that is worn down. Most bridesmaids find this size the easiest to work with.
Defined, Structured Waves
For a more polished, classic look, a 0.75 to 1-inch waver delivers tighter, more sculpted waves. This works well for shorter hair and for anyone who wants a vintage-inspired bridal style.
I personally think the 1-inch size is the sweet spot for most wedding looks. It gives you enough structure to last all day while still looking naturally beautiful in photos.
What Temperature Should I Use for Wedding Waves?
Temperature is one of the most important variables in getting wedding waves right. Too low and the wave will not hold. Too high and you risk damaging your hair right before the biggest photos of your life.
Here is a temperature guide by hair type: hairwaver
- Fine or color-treated hair: Use 300 to 330 degrees Fahrenheit. Fine hair is more fragile and heats up quickly. Lower temperatures protect it while still setting the wave.
- Normal or medium-texture hair: Use 350 to 375 degrees Fahrenheit. This is the standard range for most hair types and gives reliable, long-lasting results.
- Thick or coarse hair: Use 375 to 410 degrees Fahrenheit. Dense hair needs more heat to set properly. If your waves drop within an hour at lower temperatures, try moving up in increments of 10 degrees.
- Natural or textured hair: Use 350 to 380 degrees Fahrenheit depending on your curl pattern. Always apply a heat protectant and test a small section first.
Always start at the lower end of your range and work up only if needed. Your hair will thank you in the long run.
How Long Should You Hold a Hair Waver on Each Section?
Timing matters a lot with a hair waver. Hold it too briefly and the wave falls out quickly. Hold it too long and you risk heat damage or an overdone, crimped look. hairwaver
A good general rule is 5 to 10 seconds per section, depending on your hair type:
- Fine hair: 5 to 6 seconds
- Normal hair: 7 to 8 seconds
- Thick or coarse hair: 9 to 10 seconds
Keep your sections consistent in size. Thinner sections, about one inch wide, wave faster and give more definition. Thicker sections take a few extra seconds but create a softer, looser wave.
After releasing the waver, let the wave cool completely before touching it. This is the step most people skip and it is also the biggest reason waves fall flat too soon. Let the wave rest in your palm for a few seconds if possible. That cooling period is when the wave actually sets.
Step-by-Step Wedding Hair-Waving Routine
Here is a complete routine you can follow on the morning of the wedding.
- Wash and fully dry your hair the night before. Fresh waves hold better when the hair has a little natural texture rather than being freshly washed.
- Apply a lightweight heat protectant. Spray it evenly through damp or dry hair before any heat touches your strands.
- Add a volumizing mousse or wave-enhancing cream. Work it through your hair from mid-length to ends. This gives the waves something to grip and dramatically improves longevity.
- Section your hair into three or four horizontal layers. Clip the upper layers away and begin at the nape of your neck.
- Take a one-inch section and clamp the waver at the mid-shaft. Do not start at the root. Leaving about two inches of root space creates a more natural look.
- Hold for your hair type’s recommended time, then release slowly.
- Let the wave cool before moving on. Gently cup it in your hand for a few seconds.
- Continue working upward through each section, alternating the direction of the waver slightly on every few sections for a more natural, lived-in result.
- Once all sections are done, let the entire style cool completely. Do not rush this step.
- Apply a light-hold hairspray from about 12 inches away. Scrunch lightly with your fingers to break up any stiffness.
- Finish with a shine serum or hair oil on the ends only. This adds a polished, photo-ready glow without weighing the waves down.
How Long Do Hair Waver Curls Last?
With proper prep and finishing, hair waver waves can last 8 to 12 hours or longer. For a full wedding day, that covers your ceremony, cocktail hour, dinner, and dancing without needing a touch-up.
Several factors affect longevity: source: Brit + Co
- Hair type: Fine hair tends to lose waves faster. Using a stronger hold product and slightly higher heat helps.
- Humidity: If your wedding is outdoors in summer or in a humid venue, use an anti-humidity spray after styling.
- Products used: Mousse or a wave-setting spray before waving and a firm-hold spray after waving is the most reliable combination.
- How the waves cool: Waves that cool fully before being touched last significantly longer than waves that are moved or brushed while still warm.
Can You Use a Hair Waver on Short Hair?
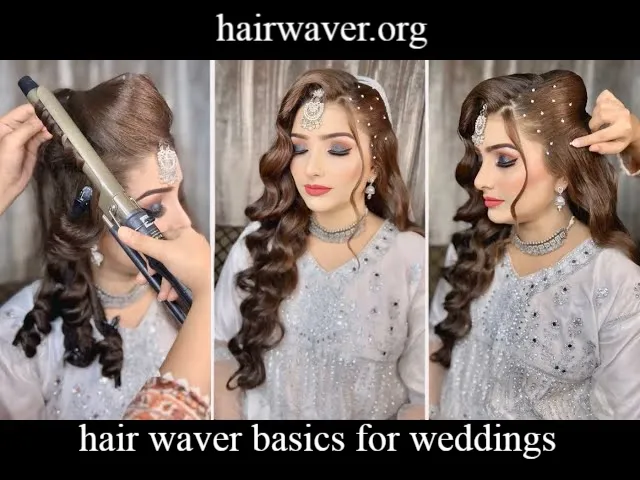
Yes, you absolutely can, but the technique changes slightly. Short hair requires smaller sections and a smaller barrel size for best results. A 0.75-inch or 1-inch waver works well on bob-length hair and pixie-adjacent cuts.
Here are a few tips for short hair specifically:
- Work with even smaller sections, about half an inch wide.
- Hold the waver vertically rather than horizontally for more control near the nape.
- Focus the wave at the mid-shaft and ends rather than near the root.
- Use a light-hold cream instead of a heavy mousse to avoid weighing short waves down.
Short waved hair at weddings looks absolutely stunning. It frames the face beautifully and holds up well throughout the day.
Practical Tips for Brides, Bridesmaids, and Wedding Guests
For brides: Do a full trial run at least two weeks before the wedding. Test the exact temperature, section size, and products you plan to use on the actual day. Take photos in natural light to see how the waves photograph.
For bridesmaids: Coordinate with the bride on the general style so the wedding party looks cohesive. If you are helping others get ready, prep your own hair first so you are not rushing.
For wedding guests: Keep your waves slightly softer and less structured than the bridal party. A loose wave at 1.25 inches looks appropriate and elegant without overshadowing the bride.
A few universal tips that apply to everyone: source: Who What Wear
- Do not skip the heat protectant. Ever.
- Sleep with your hair loosely braided the night before for built-in texture that helps waves set faster.
- Bring a small travel-size hairspray for touch-ups throughout the day.
- Avoid touching your waves more than necessary. The oils from your hands can break down the style faster than almost anything else.
Conclusion
Getting wedding-worthy waves is entirely within reach when you understand the basics. Knowing your waver size, dialing in the right temperature for your hair type, timing each section properly, and finishing with the right products gives you waves that hold beautifully from the first vow to the final slow dance.
Hair waver basics for weddings come down to preparation, patience, and a little practice. Give yourself time to do a trial run, follow the step-by-step routine above, and trust the process. Your hair will look incredible in every photo.
Are you planning to do your own wedding hair or helping someone else get ready? Share your experience or pass this guide along to a bride who could use it.
Frequently Asked Questions
1. Should I wash my hair before using a hair waver for a wedding? Wash your hair the night before, not the morning of. Day-old hair holds waves better than freshly washed hair because it has natural oils and texture that give the waves something to grip.
2. Do I need a heat protectant before using a hair waver? Yes, always. A heat protectant reduces damage and helps the wave set more evenly. Apply it before every single use, especially for an important occasion like a wedding.
3. What products help wedding waves last longer? A volumizing mousse or wave-setting cream applied before waving, combined with a firm-hold hairspray after, gives you the best longevity. An anti-humidity spray is essential for outdoor or summer weddings.
4. Can a hair waver work on very thick hair? Yes. Thick hair needs a higher temperature, generally 390 to 410 degrees Fahrenheit, and slightly longer hold times of 9 to 10 seconds per section. Take slightly smaller sections than you think you need.
5. How do I prevent frizz when using a hair waver for a wedding? Make sure your hair is completely dry before waving. Apply a smoothing serum or cream before the heat protectant. Finish with a shine oil on the ends and an anti-humidity spray over the entire style.
6. Is a crimper the same as a hair waver? No. A hair waver creates soft, S-shaped waves. A crimper creates tighter, more angular zigzag patterns. For wedding hair, a waver gives a far more elegant and versatile result.
7. How far from the root should I start waving? Leave about two inches of root unwave. This creates a more natural look and prevents the style from appearing too stiff or overdone in photos.
8. Can I use a hair waver on extensions? Yes, as long as the extensions are heat-safe. Check the manufacturer’s guidance on maximum temperature. Synthetic extensions cannot withstand high heat and will melt or become damaged.
9. Should bridesmaids use the same waver size as the bride? Not necessarily. The bride’s look typically sets the tone, but bridesmaids can use slightly different sizes to suit their individual hair lengths and textures. Keeping the wave style loosely similar creates cohesion without being matchy.
10. How do I touch up waves that have dropped during the reception? Use a small travel flat iron or a mini waver for quick touch-ups. Re-wave just the sections that need it, hold for the standard time, let cool, and finish with a light mist of hairspray.
Author Bio: Sienna Hartwell is a professional hairstylist and beauty writer with over ten years of experience in bridal hair and editorial styling. She has worked with hundreds of brides and wedding parties and specializes in helping everyday people achieve salon-quality results at home. Sienna writes to make beauty simple, accessible, and genuinely useful.
email: johanharwen@314gmail.com
Author Name: Sienna Hartwell