Introduction
You pick up your hair waver, clamp it onto a section of hair, and release. The wave barely forms. You try again. Still flat. You increase the heat and your hair starts to smell. Nothing is working the way it should, and the frustration is real.
Here is what most tutorials never tell you: great waves start before you even pick up the tool. The preparation you do in the minutes and hours before using your hair waver determines almost everything about the quality, hold, and appearance of your finished waves.
Understanding hair waver basics before styling gives you a genuine advantage. In this article, you will get clear, direct answers to every pre-styling question you have. We cover whether your hair should be wet or dry, how to apply heat protectant correctly, which temperature suits your hair type, and exactly how to section and prepare your hair for the best wave results. Every step is practical, specific, and immediately useful.
Quick Answers: What You Need to Know Before Using a Hair Waver
These direct answers address the most common pre-styling questions immediately:
- Wet or dry? Always completely dry before using a hair waver
- Heat protectant needed? Yes, every single time without exception
- Best temperature for fine hair? 300 to 330 degrees Fahrenheit
- Best temperature for thick hair? 375 to 410 degrees Fahrenheit
- Should you brush before waving? Yes, starting with smooth, tangle-free hair creates cleaner waves
Should My Hair Be Wet or Dry Before Using a Hair Waver?
Direct Answer: Your hair must be completely dry before using a hair waver. Even slightly damp hair causes steam damage inside the hair shaft when exposed to high heat, leading to breakage and protein loss over time.
This is the single most important rule in hair waver basics before styling. Many people rush through the drying process and begin styling while their hair still holds five to ten percent moisture. That residual moisture transforms into steam the moment it contacts a heated barrel. The steam expands rapidly inside each strand and weakens the hair’s structural integrity from the inside out.
You will often know you have made this mistake by a subtle sizzling or popping sound when the waver contacts the hair. If you hear that sound, stop immediately. Let your hair dry further before continuing.
How to Make Sure Your Hair Is Truly Dry
Do not rely on how your hair feels at the surface. The hair closest to your scalp and the thickest sections take significantly longer to dry than the outer layers. Follow these steps:
- Towel dry gently immediately after washing
- Apply any pre-styling products to damp hair
- Blow dry thoroughly on a medium heat setting
- Switch to a cool setting for the final two minutes
- Wait an additional ten minutes after blow drying before picking up the waver
That final ten-minute wait matters. The heat from blow drying can create a false sense of dryness on the surface while moisture lingers deeper in the strand. Those extra minutes allow everything to fully settle.
Do I Need Heat Protectant Before Using a Hair Waver?
Direct Answer: Yes. Heat protectant is non-negotiable before any heat styling. It creates a thermal barrier on each strand that significantly reduces direct heat damage from the waver’s barrels.
Skipping heat protectant is one of the most damaging mistakes in any hair styling routine. Heat protectant products coat the outer cuticle layer of each strand with protective polymers. These polymers absorb and redistribute heat more evenly, preventing hotspots from burning through individual sections. Without this barrier, repeated heat styling accumulates damage invisibly until you notice increased breakage, dryness, and split ends appearing faster than usual.
How to Apply Heat Protectant Correctly
Most people apply too little or in the wrong way. Here is the correct method: source: Merrick’s Art
- Hold the bottle eight to ten inches away from your hair
- Spray lightly and evenly from mid-length to ends
- Avoid concentrating product directly at the scalp
- Work the product through with your fingers to distribute evenly
- Allow sixty seconds for absorption before proceeding
- Reapply to any section you need to restyle or return to
A common mistake is applying heat protectant to soaking wet hair and immediately blow drying. You want a light, even application on hair that is already mostly dry but not yet completely finished. This gives the product time to properly coat each strand before the heat waver touches it.
What Temperature Should I Use on a Hair Waver?
Direct Answer: The correct temperature depends entirely on your hair type. Fine hair needs the lowest settings. Thick or coarse hair requires the highest. Using the wrong temperature either damages hair or produces waves that fall flat within an hour.
Choosing your temperature before you begin is a critical part of hair waver basics before styling. Many people simply set the dial to maximum and hope for the best. This approach works for very thick hair but causes serious damage to fine, color-treated, or already-fragile strands.
Hair Waver Temperature Guide by Hair Type
| Hair Type | Recommended Temperature | Notes |
|---|---|---|
| Fine or Thin Hair | 300 to 330 degrees Fahrenheit | Start at the lower end first |
| Normal or Medium Hair | 340 to 375 degrees Fahrenheit | 350 degrees suits most people |
| Thick or Coarse Hair | 375 to 410 degrees Fahrenheit | High heat needed for lasting waves |
| Color-Treated Hair | 300 to 340 degrees Fahrenheit | Color weakens heat tolerance |
| Natural or Textured Hair | 350 to 400 degrees Fahrenheit | Add moisture products before waving |
| Previously Bleached Hair | 280 to 320 degrees Fahrenheit | Bleached hair is highly fragile |
Always start five to ten degrees lower than your target temperature. Test one small section. If the wave forms cleanly and holds shape, your temperature is correct. If the section springs back within a minute, increase slightly and test again. This approach protects your hair while helping you identify the exact right setting for your specific hair.
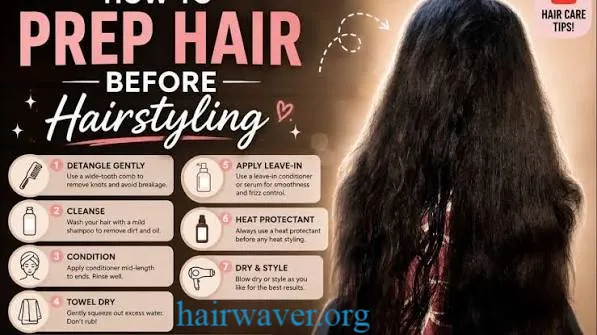
How Do I Prepare My Hair for Waves? Complete Pre-Styling Routine
This is the step-by-step process that transforms preparation into results. Follow this routine every time you use a hair waver and your wave quality will improve dramatically. hairwaver
Step 1: Start with Clean Hair
Clean hair holds waves better than hair coated in old styling products. Built-up hairspray, dry shampoo, and serum from previous days create a film on the hair shaft that prevents heat from penetrating evenly. Wash your hair the evening before or morning of your waving session.
That said, freshly washed hair can sometimes be too soft and slippery to hold waves well. If you find this is your experience, wash the night before and wave the next morning. The slight natural oil production overnight gives your hair better grip.
Step 2: Condition but Avoid Over-Conditioning
Use your regular conditioner but keep it from the mid-length to ends only. Conditioner applied at the roots weighs hair down before styling even begins and can make waves fall flat faster. Rinse thoroughly to remove all product residue.
Step 3: Apply Pre-Styling Products to Damp Hair
This is the time to add any products designed to build texture or hold. Apply these to damp hair before blow drying:
- For fine or straight hair: Apply a lightweight volumizing mousse to add grip
- For medium hair: Apply a texture spray or sea salt spray for extra wave definition
- For thick or frizzy hair: Apply a light smoothing cream to reduce frizz during waving
- For natural or textured hair: Apply a leave-in conditioner before anything else
Work each product evenly through your hair with your fingers before blow drying.
Step 4: Blow Dry Thoroughly
Blow dry your hair in the direction of your wave. For most people, this means working downward from root to tip. Use a medium heat setting and a low speed to minimize frizz during the drying process. Finish with a cool blast on every section you dry to help lock the cuticle down.
Do not rush this step. Thorough drying is the foundation of everything that follows. source: Tymo Beauty
Step 5: Apply Heat Protectant to Dry Hair
Once your hair is completely dry, apply heat protectant spray. Work from mid-length to ends. Distribute evenly and allow it to absorb for sixty seconds.
Step 6: Section Your Hair
Sectioning is the most underrated part of pre-styling preparation. Without proper sections, your waving technique becomes inconsistent and some areas get more heat than others.
Divide your hair into four main sections:
- Bottom section from ear to ear across the back of your head
- Left side from ear to crown
- Right side from ear to crown
- Top and front sections
Clip all sections except the bottom one. This gives you organized access to each area as you wave from the bottom up. Working from the bottom up also means any upper sections cover your earlier work, creating a seamless layered wave effect.
Step 7: Set Your Temperature
Set your hair waver to the temperature appropriate for your hair type using the guide above. Allow two to three minutes for the tool to fully reach its set temperature before touching your hair. Most modern wavers have indicator lights that confirm when the correct heat is reached.
Step 8: Check Your Barrel and Your Time
Before waving your first section, quickly check that your barrels are clean and free of product residue from previous sessions. Dirty barrels transfer old product onto clean hair and cause uneven heat distribution. Wipe cool barrels with a dry microfiber cloth if needed.
Now you are ready. You have dry hair, proper sections, clean barrels, heat protectant applied, and the correct temperature set. Your wave results will reflect every one of these preparation steps.
Pre-Styling Checklist: Hair Waver Basics Before Styling
Run through this checklist before every single waving session:
- Hair is completely dry including near the scalp
- Heat protectant spray has been applied to mid-length and ends
- Temperature is set correctly for your hair type
- Hair is divided into four clean sections with clips
- Barrels are clean and free from product buildup
- You have allowed the tool two to three minutes to reach temperature
- You have pre-styling products applied if needed for your hair type
Conclusion
Hair waver basics before styling are genuinely the difference between waves that impress and waves that disappoint. Completely dry hair, correct heat protectant application, appropriate temperature settings, and organized sectioning all work together to create the foundation your waving technique needs to perform at its best.
The preparation takes less than fifteen minutes. Most of that time is simply waiting for your hair to dry fully and your tool to reach temperature. That patience pays dividends in waves that last all day rather than falling flat by mid-morning.
Which pre-styling step were you skipping before reading this? Share your experience in the comments and let us know which change made the biggest difference to your wave results.
FAQs About Hair Waver Basics Before Styling
1. What should I do before using a hair waver? Ensure your hair is completely dry, apply heat protectant spray to mid-length and ends, set your waver to the correct temperature for your hair type, and divide your hair into four clean sections. This preparation takes about fifteen minutes and dramatically improves your wave results.
2. Should my hair be wet or dry before using a hair waver? Always completely dry. Even slightly damp hair creates steam inside the hair shaft when exposed to high heat. This steam breaks down the hair’s internal protein structure, causing long-term damage and breakage. Never use a hair waver on hair that is not fully dried.
3. Do I need heat protectant before using a hair waver? Yes, every time. Heat protectant spray coats each strand with protective polymers that absorb and redistribute heat evenly. Without it, repeated heat styling causes cumulative damage that leads to increased breakage, dryness, and split ends over weeks and months.
4. What temperature should I use on a hair waver? Fine hair needs 300 to 330 degrees Fahrenheit. Normal hair suits 340 to 375 degrees. Thick or coarse hair requires up to 410 degrees. Color-treated hair should stay between 300 and 340 degrees. Always start at the lower end of your range and increase gradually if waves are not holding.
5. How do I prepare my hair for beach waves? Wash your hair, apply a sea salt or texture spray to damp hair, blow dry thoroughly, apply heat protectant to dry hair, section into four parts, and wave from the bottom sections upward. Using a texture spray before drying gives beach waves the gritty, effortless quality that makes them look naturally sun-kissed.
6. Should I brush my hair before using a hair waver? Yes. Start with smooth, tangle-free hair so the waver moves cleanly through each section. Use a wide-tooth comb or paddle brush before sectioning. Brushing after waving breaks the wave pattern before it sets, so save any brushing or touching until waves have fully cooled.
7. Should I wash my hair before using a hair waver? Clean hair holds waves better than hair coated in old products. However, freshly washed hair can sometimes be too slippery. Washing the night before and waving the following morning gives your hair a slight amount of natural texture that actually helps waves grip and hold longer.
8. How long should I wait after blow drying before using a hair waver? Wait at least ten minutes after blow drying before picking up your hair waver. Blow drying creates surface heat that can make hair feel dry when deeper sections still hold residual moisture. Those extra minutes allow everything to settle and ensure you are styling on genuinely dry hair.
9. Does sectioning hair really matter before waving? Absolutely. Proper sectioning ensures consistent heat exposure across all sections, organized access to every area of your head, and a layered wave effect that looks seamless. Without sections, some areas receive more heat than others and your waves look uneven and inconsistent.
10. Can I use a hair waver on unwashed hair? You can, but results are less consistent. Product buildup from dry shampoo, hairspray, and serum creates a film on hair strands that blocks even heat penetration. If you prefer not to wash before waving, remove as much buildup as possible with a dry brush and check that your heat protectant still absorbs cleanly.
About the Author : Sofia Lane is a licensed cosmetologist and beauty writer with over nine years of experience working in professional salons across New York and Los Angeles. She specializes in modern hair styling techniques, hair care education, and salon tool reviews. Sofia believes that every person deserves access to professional-level hair knowledge without needing a salon appointment. When she is not writing or styling, she teaches hair waving and texturing workshops for aspiring stylists and everyday clients.
email: johanharwen@314gmail.com
Author Name: Sofia Lane